
この記事はNTTドコモR&Dアドベントカレンダー2023の17日目の記事です。
こんにちは、NTTコノキューの中矢です。 業務ではUnity、C#と格闘しています。
本記事では、AndroidのNativeアプリにUnityで作った画面をモジュールとして組み込むことができるUnity as a Libraryを紹介します。
本記事が少しでもUnity as a Library初学者の参考になれば幸いです。
Unity as a Libraryとは
Unity as a Libraryとは、ゲームエンジンUnityで開発した機能をAndroidやiOSのNativeアプリにモジュールとして組み込む技術です。
利用用途として、例えば3D描画のあるSNSアプリを作りたいとなったとします。Unityは3D描画部分の開発に強いですが、SNS部分は弱いです。逆にNativeはSNS部分の開発に強いですが、3D部分はそこまで強くありません。そのようなときに、Unity as a Libraryを使うと、3D部分は3Dに強いUnityで作り、SNS部分はNativeで作ることが可能になります。
このように、Unityが強い部分はUnityが作り、Nativeが強い部分はNativeでアプリを作ることが可能となります。
サンプルで作るアプリ
本記事でサンプルで作るアプリは以下になります。
下部のボタンをタップすると、キャラクターのアニメーションが切り替わり、上部の3D描画部分をスワイプすると、キャラクターを移動させることができる簡単なアプリになります。
環境
- Windows 11
- Unity 2022.3.9f1
- Android Studio Giraffe | 2022.3.1 Patch 3
Unityで3D部分を作る
Unityでシーンを作ります。
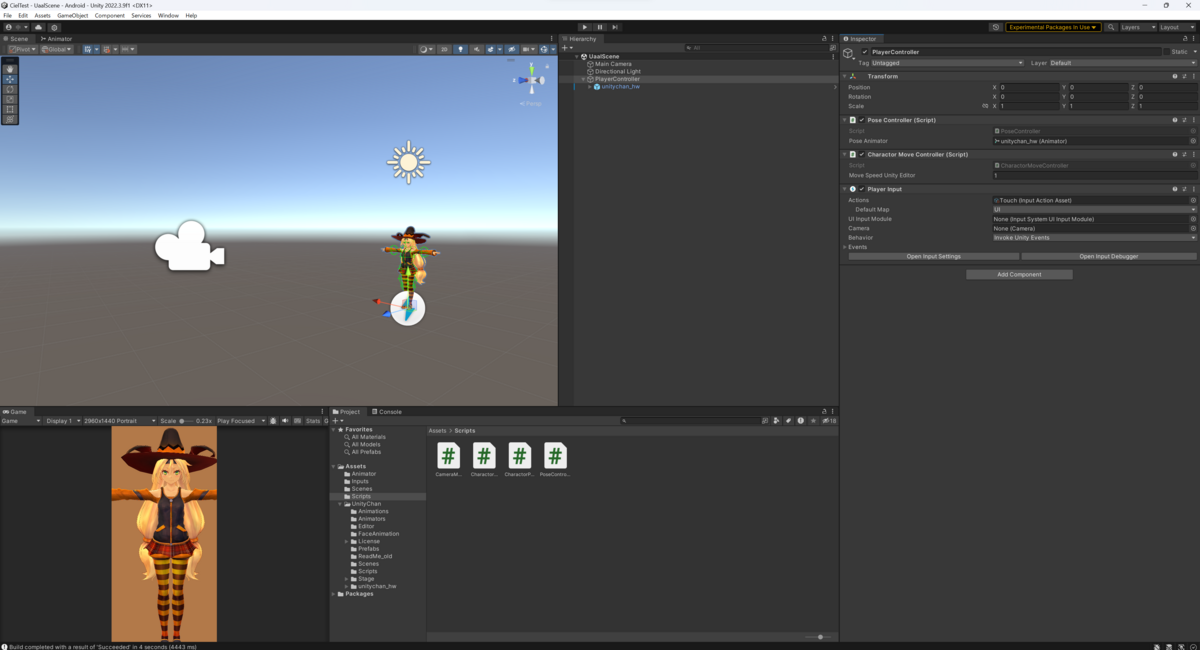
PlayerControllerというオブジェクトの配下にユニティちゃんを配置し、PlayerControllerオブジェクトにアタッチされているPoseController.csがポーズの変更を処理し、CharactorMoveController.csがスワイプによるキャラクターの移動を処理しています。また、入力検知はInput Systemを利用しています。
続いて、サンプルコードを解説します。PoseController.csは以下です。
using UnityEngine;

/// <summary>
/// キャラクターのポーズを変更するクラス
/// </summary>
public class PoseController : MonoBehaviour
{
    [SerializeField] private Animator poseAnimator;

    // Update is called once per frame
    void Update()
    {
#if UNITY_EDITOR
        if (Input.GetKeyDown("space"))
        {
            ChangePose();
        }
#endif
    }
    /// <summary>
    /// キャラクターのポーズを変更する。
    /// Nativeから呼び出すためpublicにしている。
    /// </summary>
    public void ChangePose()
    {
        // ChangePoseというパラメータをAnimatorに設定し、
        // これをトリガーとしてポーズを変更する
        poseAnimator.SetTrigger("ChangePose");
    }
}
ここで、ChangePose()メソッドは、ネイティブから呼び出すメソッドです。
次に、CharactorMoveController.csのコードを載せます。
using UnityEngine;
using UnityEngine.InputSystem;
using UnityEngine.InputSystem.LowLevel;
/// <summary>
/// スワイプでキャラクターを移動させるクラス
/// </summary>
public class CharactorMoveController : MonoBehaviour
{
    [SerializeField] private float moveSpeedUnityEditor = 1f;
    private float moveSpeed = 0.01f;
    private TouchState touchState;
    private Rect validSwipeArea;

    private float swipeableAreaRate = 0.8f; // 画面の中で上から何割がスワイプ可能なエリアか?

    public void OnTouch(InputAction.CallbackContext context)
    {
        touchState = context.ReadValue<TouchState>();

        OnSwipe();
    }

    /// <summary>
    /// スワイプの入力量を検知し、キャラクターを移動させる
    /// </summary>
    private void OnSwipe()
    {
        // 指が移動していなかれば操作なしと判断
        if (!touchState.isInProgress || !validSwipeArea.Contains(touchState.position)) return;

        // 移動量(スクリーン座標)
        Vector2 delta = touchState.delta;
        MoveCharactor(delta);
    }

    /// <summary>
    /// キャラクターを移動させる
    /// </summary>
    /// <param name="moveDirection">移動入力量</param>
    private void MoveCharactor(Vector2 moveDirection)
    {
        Vector2 _moveDirectionVector2 = moveDirection * Time.deltaTime;
#if UNITY_EDITOR
        _moveDirectionVector2 *= moveSpeedUnityEditor;
#else
        _moveDirectionVector2 *= moveSpeed;
#endif
        Vector3 _moveDirection = new Vector3(-_moveDirectionVector2.x, _moveDirectionVector2.y, 0f);
        this.transform.Translate(_moveDirection);
    }

    void Start()
    {
        // 画面の高さのswipeableAreaRateの割合を計算し、上からの有効なスワイプ領域を設定する
        float startValidHeight = Screen.height * (1.0f - swipeableAreaRate);
        validSwipeArea = new Rect(0, startValidHeight, Screen.width, Screen.height);
    }

    // Update is called once per frame
    void Update()
    {
#if UNITY_EDITOR
        if (Input.GetMouseButton(0))
        {
            MoveCharactor(new Vector2(Input.GetAxis("Mouse X"), Input.GetAxis("Mouse Y")));
        }
#endif
    }
}
こちらはUnityでスマホアプリを作るときと同様に書きます。Unity as a LibraryでUnity部分をNativeに組み込んでも、Unity部分のUIはそのまま検知できます。
ただし、UnityのViewを例えNative側で小さくしていたとしても、Screen.heightなどはスマホの全画面の高さを取得しているため、NativeのUIの領域にUnityのタップ処理が入らないように注意する必要があります。
Native部分の入力検知に利用しているInput Systemは【Unity】Input Systemでピンチやマルチスワイプを実現するを参考に実装しました。
Unity as a LibraryとしてExportする
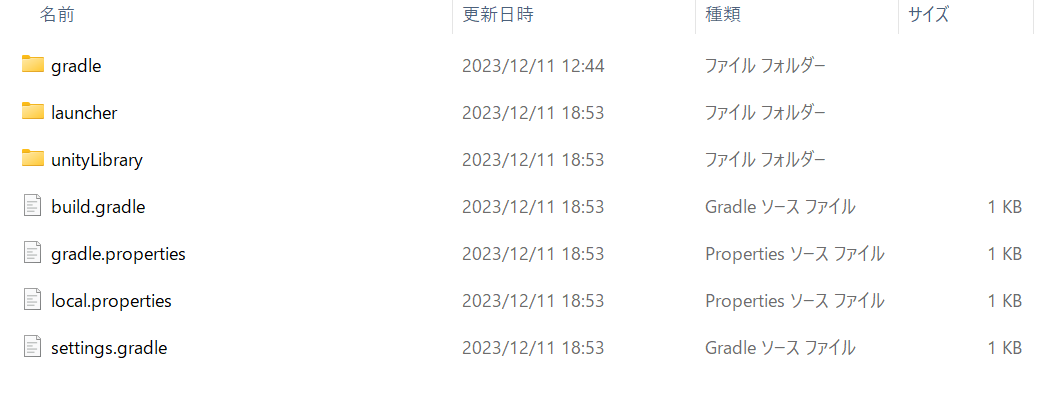
Unity as a Libraryとして出力します。出力方法はUnity-Technologiesが提供しているサンプルのドキュメントに沿っています。
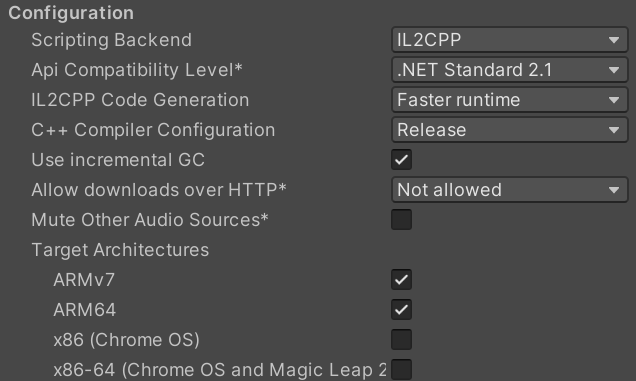
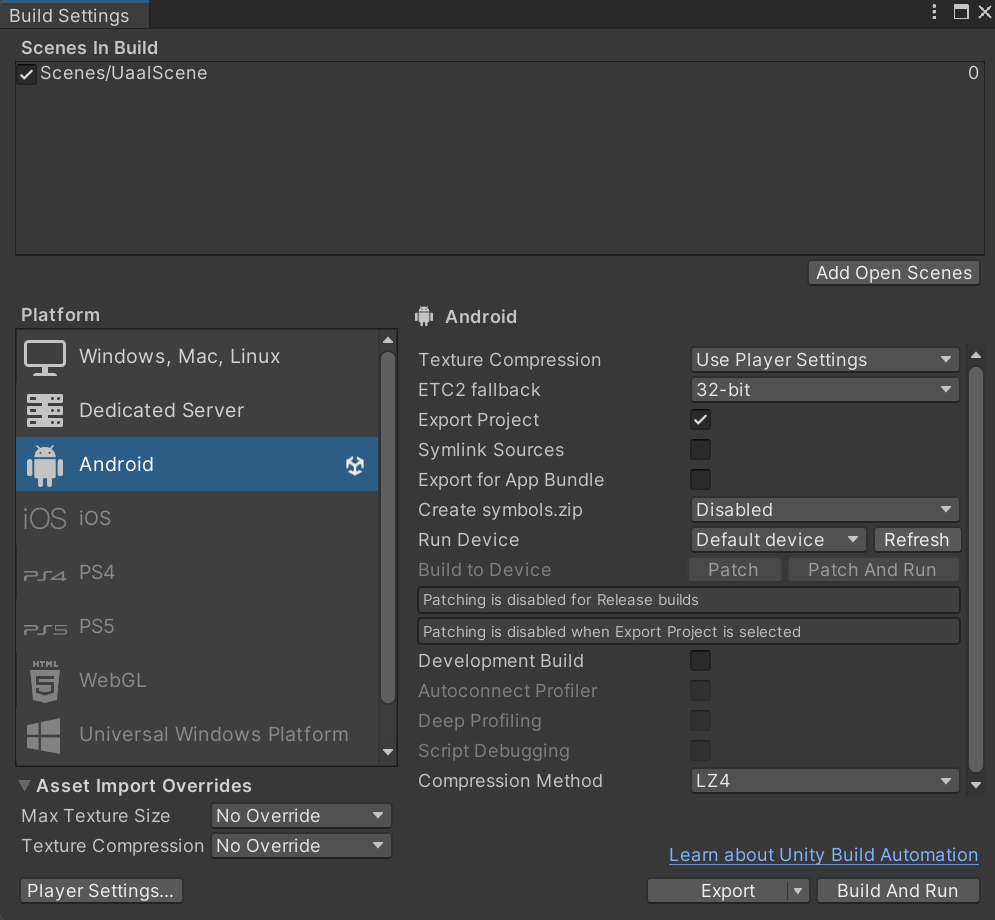
まず、AndroidにSwitch Platformし、PlayerSettingsでOther Settings -> Configuration -> Targeted ArchitecturesのARMv7とARM64にチェックを入れます。
Export Projectにチェックを入れ、Exportします。
build.gradleファイルに以下のように追記します。
// 省略 ...

android {
    // 以下を追記 ================
    namespace 'com.unity3d.player'
    // ==========================

    ndkPath "C:/Program Files/Unity/Hub/Editor/2022.3.9f1/Editor/Data/PlaybackEngines/AndroidPlayer/NDK"

    compileSdkVersion 32
    buildToolsVersion '32.0.0'

// 省略 ...
これは、後にAndroid Studioでビルドするときに、namespaceが無いと怒られるため、その対策として追記しています。
AndroidにUnity as a Libraryを組み込む
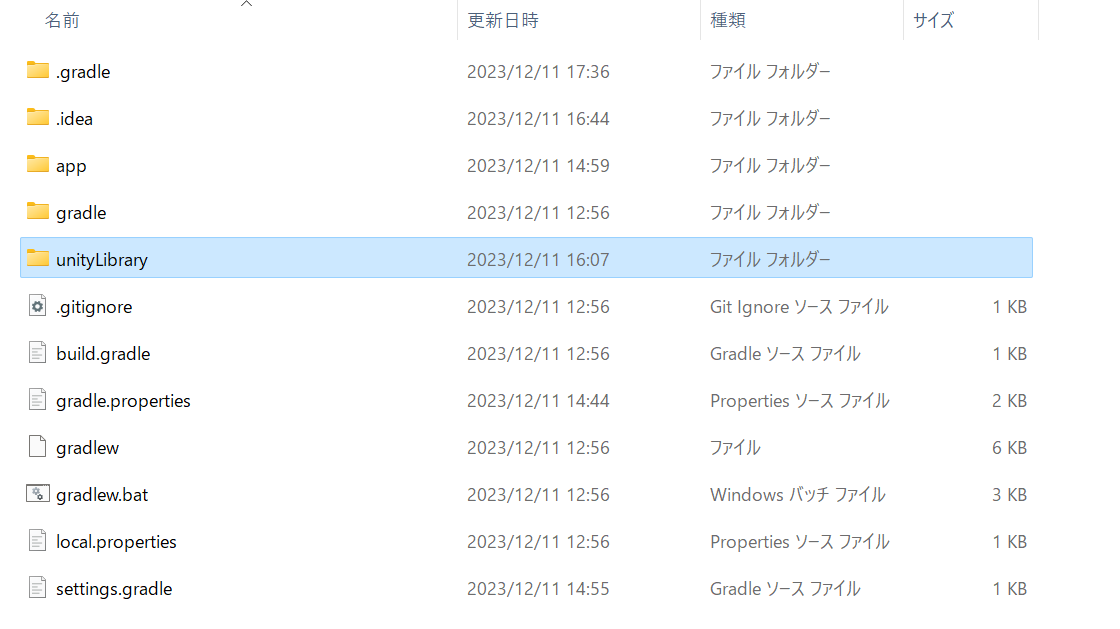
Android Studioで新規プロジェクトを作成し、以下のように先ほど出力したunityLibraryフォルダを、Projectフォルダ直下に配置します。
setting.gradleファイルに以下を追記します。
include ':unityLibrary'
project(':unityLibrary').projectDir=new File('unityLibrary')
また、setting.gradleファイルのdependencyResolutionManagement { repositories { ブロックに、flatDirブロックを追記します。
include ':unityLibrary'
project(':unityLibrary').projectDir=new File('unityLibrary')

dependencyResolutionManagement {
    repositoriesMode.set(RepositoriesMode.FAIL_ON_PROJECT_REPOS)
    repositories {
        google()
        mavenCentral()
        // 追記 =======================
        flatDir {
            dirs "${project(':unityLibrary').projectDir}/libs"
        }
        // ===========================
    }
}
続いて、build.gradleファイルのdependenciesブロックに以下を追記します。
dependencies {

    implementation project(':unityLibrary')
    implementation fileTree(dir: project(':unityLibrary').getProjectDir().toString() + ('\\libs'), include: ['*.jar'])
    // 省略...
}
また、build.gradleファイルのandroid { defaultConfig { ndkブロックに以下のように記述します。
android {
    namespace 'com.yanpick.uaaltest2'
    compileSdk 33

    defaultConfig {
        //省略...
        versionName "1.0"

        testInstrumentationRunner "androidx.test.runner.AndroidJUnitRunner"
        // 追記 =====================
        ndk {
            abiFilters "armeabi-v7a", "arm64-v8a"
        }
        // =========================
        // 省略...
    }
そして、Unityから出力したファイル群の中のgradle.propertiesの中身を、Android Studioのgradle.propertiesに追記する形でコピーします。
# 省略
# 以下を追記し、元のorg.gradle.jvmargsは削除する
org.gradle.jvmargs=-Xmx4096M
org.gradle.parallel=true
unityStreamingAssets=
unityTemplateVersion=5
最後に、Syncして成功するとunityLibraryフォルダがAndroid Studioに認識されます。
Androidアプリの実装
Androidのレイアウトを定義しているactivity_main.xmlファイルを編集します。
<?xml version="1.0" encoding="utf-8"?>
<androidx.constraintlayout.widget.ConstraintLayout xmlns:android="http://schemas.android.com/apk/res/android"
    xmlns:app="http://schemas.android.com/apk/res-auto"
    xmlns:tools="http://schemas.android.com/tools"
    android:layout_width="match_parent"
    android:layout_height="match_parent"
    tools:context=".MainActivity">

    <androidx.constraintlayout.widget.ConstraintLayout
        android:id="@+id/unity"
        android:layout_width="0dp"
        android:layout_height="0dp"
        app:layout_constraintEnd_toEndOf="parent"
        app:layout_constraintHeight_percent="0.8"
        app:layout_constraintStart_toStartOf="parent"
        app:layout_constraintTop_toTopOf="parent" />

    <LinearLayout
        android:layout_width="0dp"
        android:layout_height="0dp"
        android:gravity="center"
        android:orientation="vertical"
        app:layout_constraintBottom_toBottomOf="parent"
        app:layout_constraintEnd_toEndOf="parent"
        app:layout_constraintStart_toStartOf="parent"
        app:layout_constraintTop_toBottomOf="@+id/unity">

        <TextView
            android:id="@+id/textView"
            android:layout_width="wrap_content"
            android:layout_height="wrap_content"
            android:text="Hello Uaal World!" />

        <Button
            android:id="@+id/button"
            android:layout_width="wrap_content"
            android:layout_height="wrap_content"
            android:layout_marginTop="8dp"
            android:text="Button" />

    </LinearLayout>

</androidx.constraintlayout.widget.ConstraintLayout>
続いて、MainActivity.ktを編集します。
package com.yanpick.uaaltest2 // Projectに合わせて編集

import androidx.appcompat.app.AppCompatActivity
import android.os.Bundle
import android.view.ViewGroup
import android.widget.Button
import android.view.WindowManager.LayoutParams.SCREEN_ORIENTATION_CHANGED
import androidx.constraintlayout.widget.ConstraintLayout
import com.unity3d.player.UnityPlayer
import com.unity3d.player.UnityPlayerActivity

class MainActivity : UnityPlayerActivity() {

    override fun onCreate(savedInstanceState: Bundle?) {
        super.onCreate(savedInstanceState)
        setContentView(R.layout.activity_main)

        window.clearFlags(SCREEN_ORIENTATION_CHANGED)
        findViewById<ConstraintLayout>(R.id.unity)?.addView(
            mUnityPlayer, ViewGroup.LayoutParams(
                ViewGroup.LayoutParams.MATCH_PARENT,
                ViewGroup.LayoutParams.MATCH_PARENT
            )
        )

        val buttonChangeSky = findViewById<Button>(R.id.button)
        buttonChangeSky.setOnClickListener {
            UnityPlayer.UnitySendMessage("PlayerController", "ChangePose", "")
        }
    }
}
最後にstring.xmlを以下のように編集します。編集をしないとクラッシュします。(参考:Unity as a Libraryを使ってみよう ~AndroidとUnityだってチームを組める~)
<resources>
    <string name="app_name">UaalTest2</string>
    <string name="game_view_content_description">Game view</string>
</resources>
以上でAndroid側の実装は完了です。実機に入れて動作確認してみましょう。
ここで注意ですが、本バージョンのAndroid Studioでは、エミュレータの動作は不安定です。そのため、実機での動作確認をお勧めします。
MainActivity.kt の解説
最後にMainActivity.ktの内容について簡単に解説します。
まず、MainActivityクラスはUnityPlayerActivityクラスを継承しています。
// 省略
import com.unity3d.player.UnityPlayer
import com.unity3d.player.UnityPlayerActivity

class MainActivity : UnityPlayerActivity() {
    override fun onCreate(savedInstanceState: Bundle?) {
        super.onCreate(savedInstanceState)
        setContentView(R.layout.activity_main)

        window.clearFlags(SCREEN_ORIENTATION_CHANGED)
        findViewById<ConstraintLayout>(R.id.unity)?.addView(
            mUnityPlayer, ViewGroup.LayoutParams(
                ViewGroup.LayoutParams.MATCH_PARENT,
                ViewGroup.LayoutParams.MATCH_PARENT
            )
        )
    // 省略
    }
}
UnityPlayerActivityクラスには、mUnityPlayerというメンバ変数があり、これがactivity_main.xmlでidがunityで定義されるレイアウトにaddViewすることで、UnityのViewをConstraintLayoutに重ねるように描画しています。
続いて、ボタンの処理の実装ですが、ボタンを押下するとUnityPlayer.SendMessageメソッドでUnity側の実装にメッセージを飛ばしてUnity側のメソッドを起動しています。
// 省略
import com.unity3d.player.UnityPlayer
import com.unity3d.player.UnityPlayerActivity

class MainActivity : UnityPlayerActivity() {

    override fun onCreate(savedInstanceState: Bundle?) {
        // 省略
        val buttonChangeSky = findViewById<Button>(R.id.button)
        buttonChangeSky.setOnClickListener {
            UnityPlayer.UnitySendMessage("PlayerController", "ChangePose", "")
        }
    }
}
UnitySendMessageメソッドの引数はすべてstring型であり、第1引数はUnityのSceneに配置されているGameObject名、第2引数はアタッチされているコンポーネントに実装されているpublicなメソッド名、第3引数は、呼びだすメソッドの引数になります。 上記の実装では、PlayerControllerオブジェクトのChangePoseメソッドを引数なしで呼びだしています。 また、今回は第3引数は使用していないですが、Unity側のメソッドに何らかのパラメータを渡す場合は、string型でないと渡せません。そのため、Nativeから呼びだすUnity側のメソッドに引数を渡す場合は工夫が必要になります。
まとめ
本記事では、Unity as a Libraryを利用して、AndroidアプリにUnityで開発したモジュールを組み込む方法を紹介、解説しました。Nativeアプリメインで3D描画を必要とするときに、Unity as a Libraryの採用を検討してみてもいいのかもしれません。
© Unity Technologies Japan/UCL